
Image Viewer Help
The Image Viewer gives you a detailed view of a single image on the current microfilm reel. You typically enter the Image Viewer by clicking on an image in the Reel Viewer. Most of the viewer is taken up by the Vieweing Pane, in which the current image appears. On the right hand side of the screen is the Image Control Sidebar, which provides information about the current image along with tools to increase its readibility.
 Info Panel
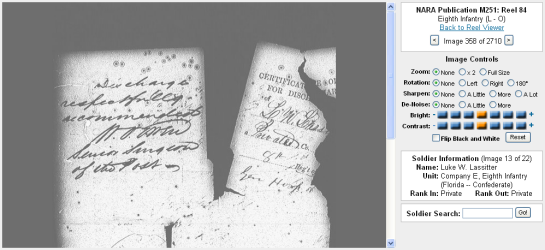
At the top of the Image Control Sidebar is the Info Panel. The Info Panel displays the current microfilm publication and reel. It also shows you which image on the reel is being viewed. The left and right arrow buttons jump to the previous or next image on the reel without having to go back to the Reel Viewer.
If you wish to go back the Reel Viewer, click the Back to Reel Viewer link.
Image Controls
Civil War Microfilm provides a comprehensive set of tools to increase the readibility of the source images. While 50 year-old microfilm versions (of dubious quality) of 100 to 140+ year-old source documents present a unique challenge, when used properly the following controls can dramatically increase an image's legibility.
Zoom: Zoom controls the size of the image in the viewing pane. The default zoom setting, "None," loads the fastest and allows quick viewing of most details of an image. The "x2" zoom setting is optimized for viewing CSRs in detail -- a card at this zoom factor will fill the entire width of the viewing pane. Images viewed at the "x2" setting load more slowly than those with no zoom factor applied. "Full Size" will display the image at its maximum available (unscaled) size.
Rotation: Rotation allows an image to be rotated left or right 90 degrees or completely upside down (the "180°" setting). This allows images which were filmed horizontally to be read without turning one's head sideways to view the screen.
 Sharpen: The Sharpen control is a powerful image processing function which can help to read out-of-focus-images or documents which were originally written in pencil. Be aware that applying the Sharpen control will introduce some noise to the image. "More" is probably the most useful setting. Using the "A Lot" setting will significantly sharpen an image; however, a lot of background noise may be added as well. As with other tools, the higher settings of this control will require more time to process.
De-Noise:This control is somewhat the opposite of Sharpen. It reduces background noise and "graininess" and allows the text to stand out better against the page. The "A Little" setting of this control is the best one to use for most images. The "More" setting may cause blurring and sometimes reduce readibility. You may want to try using this tool in conjunction with the Sharpen filter on poor quality images (first images are De-Noised, and then the result is Sharpened).
Bright and Contrast: These two controls work just like the knobs on an old black and white television. The middle box on the scale is the default (unmodified) setting. Settings to the left of center reduce the brightness or contrast of the image, while settings to the right of center increase it. Reducing the Bright darkens an image, while increasing the Bright lightens it. Similarly, reducing the Contrast adds more shades of gray and can actually reveal "hidden" details, while increasing the Contrast moves grays toward either black or white. This can help to fill in broken pencil handwriting (especially in conjunction with Sharpen "More").
Flip Black and White: This tool creates a "photo-negative" version of the image, which sometimes makes certain parts of a document easier to read.
Reset: Clicking this button resets all of the image controls back to their default settings. This a quick way to start over if you've made a lot of adjustments.
Soldier Information
If the current image has been tagged as part of a soldier's record, the Soldier Information panel will appear. The soldier's Name, Unit, and Rank In / Rank Out will be displayed.
If the current image has not been tagged, the message "This Image is not tagged" will appear.
Soldier Search
To search for tagged soldiers directly from the Image Viewer, enter the soldier's name into the Soldier Search text field and hit Enter or click the Go! button. The Soldier Search Results screen will appear with a list of all tagged soldiers which match the name you entered.